Imagine this: you’re driving home after a long day, and suddenly thump, thump, thump your tire goes flat. Panic sets in, right? Don’t worry you’re not alone.
Changing a tire is a skill every driver should know, and the good news is, it’s easier than most people think.
Whether you’re stranded on a busy road or simply want to be prepared for emergencies, knowing how to change a tire safely can save you time, money, and stress.
In this guide, I’ll walk you through every step from gathering the right tools to installing your spare so you can confidently handle a flat tire situation.
By the end of this article, even beginners will feel capable of tackling a tire change like a pro, ensuring you stay safe and back on the road quickly.
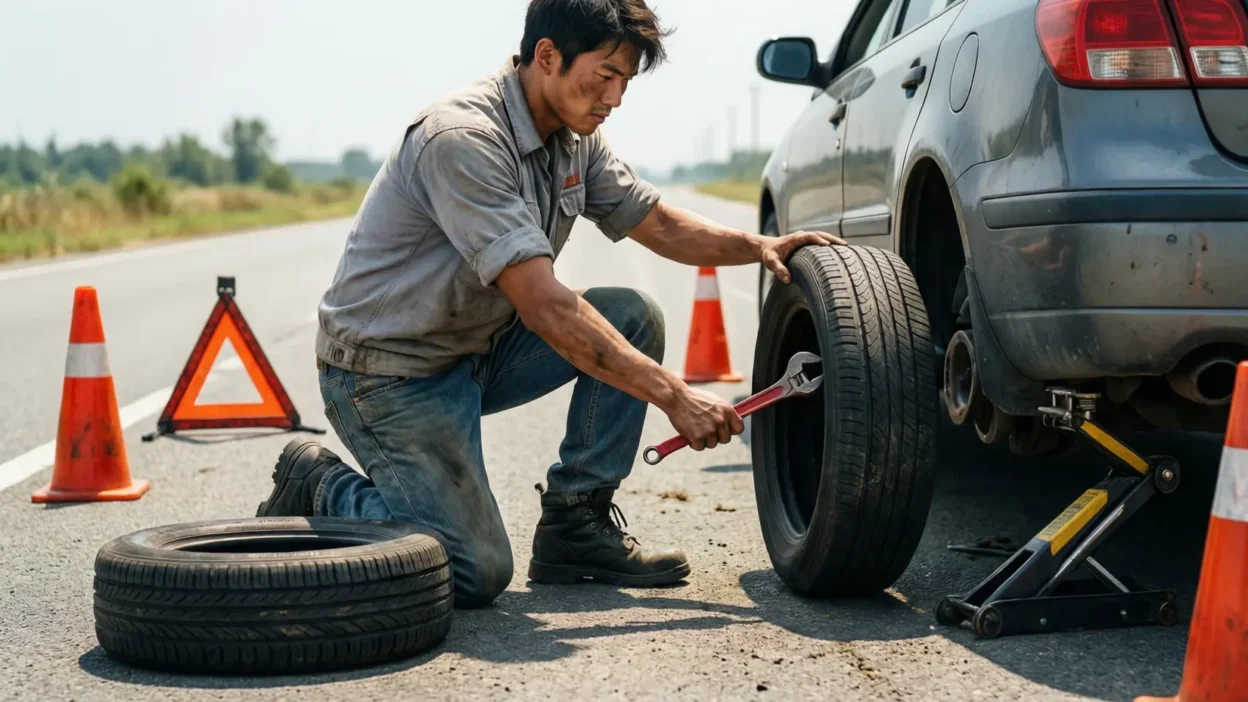
Tools and Equipment You’ll Need
Before you even attempt to change a tire, it’s essential to have the right tools on hand. Having everything ready not only makes the process smoother but also ensures your safety while working on the roadside. Here’s what you’ll need for a successful tire change:
- Spare Tire – Always check your spare tire before a trip. Make sure it’s properly inflated and in good condition. Depending on your vehicle, it could be a full-size tire or a compact “donut” spare.
- Car Jack – A reliable jack is crucial to lift your vehicle safely. Most cars come with a scissor or hydraulic jack. Ensure you know the correct lifting points for your car to avoid damage.
- Lug Wrench – Also called a tire iron, this tool is used to loosen and tighten lug nuts. Some vehicles include a cross wrench, which provides better leverage.
- Wheel Wedges – Placing these under the wheels prevents the car from rolling while you change the tire. Safety first!
- Optional Items – Gloves protect your hands from dirt and sharp edges. A flashlight is useful for nighttime changes, and a reflective vest or hazard triangles increase visibility on busy roads.
Pro Tip: Regularly check that your spare tire is in good condition and that all tools are in place. Keeping them organized in your trunk can save precious time during an emergency.
Having the right tools makes changing a tire much less stressful, allowing you to focus on the process itself rather than worrying about safety or missing equipment. Once your tools are ready, you’re set to tackle a flat tire with confidence.
Safety First – Before You Start
Before you even touch the tire, safety must be your top priority. Changing a tire on the roadside can be risky if proper precautions aren’t taken, so following safety steps is essential.
1. Choose a Safe Location – If your tire goes flat while driving, don’t stop in the middle of the road or on a hill. Look for a flat, stable surface away from traffic. A parking lot or the shoulder of a quiet road is ideal.
2. Turn on Hazard Lights – Immediately switch on your hazard lights to alert other drivers. This increases visibility and reduces the risk of accidents while you’re working.
3. Engage Parking Brake and Wheel Wedges – Set the parking brake and place wheel wedges behind or in front of the tires opposite the flat. This prevents the car from rolling while it’s lifted.
4. Wear Protective Gear – Gloves protect your hands from grease, dirt, and sharp edges. If you’re on a busy road, a reflective vest or brightly colored clothing makes you visible to passing traffic.
5. Mind Your Surroundings – Always be aware of traffic and road conditions. Avoid distractions like phones, and don’t rush the process. Taking your time ensures the procedure is done safely and correctly.
Pro Tip: If it’s dark or visibility is poor, use a flashlight or roadside flares to mark your location. Safety is more important than speed never compromise it just to get back on the road quickly.
By prioritizing safety before you begin, you reduce the risk of injury and ensure a smoother tire change process. Once your location is secure and tools ready, you can confidently move on to loosening the lug nuts.
Step-by-Step Process to Change a Tire
Changing a tire may seem intimidating at first, but by breaking it down into clear steps, anyone can do it safely. Here’s how to start:
1. Loosen the Lug Nuts
Before lifting the car, slightly loosen the lug nuts on the flat tire using your lug wrench. Turn them counterclockwise, but don’t remove them completely yet. Loosening them while the car is on the ground prevents the wheel from spinning, making it easier to turn the nuts.
2. Lift the Vehicle with a Jack
Locate the correct jack point for your car usually indicated in your vehicle’s manual or near the tire well. Place the jack securely under this point and slowly raise the car until the flat tire is off the ground. Make sure the car is stable and the jack is on solid, level ground to avoid accidents.
3. Remove the Flat Tire
Once the car is lifted, fully unscrew the loosened lug nuts and carefully remove the flat tire. Set the tire aside in a safe place where it won’t roll or cause obstruction.
4. Prepare for the Spare Tire
Inspect the spare tire to ensure it’s properly inflated and free of damage. Align the spare tire’s holes with the wheel bolts and slide it onto the hub carefully. Hand-tighten the lug nuts to hold the tire in place while the car is still elevated.
Pro Tip: Work slowly and steadily. Rushing can cause slips, injuries, or damage to the car. By following these initial steps carefully, you set a strong foundation for a successful tire change.
Complete the Tire Change and Perform Final Checks
Once the spare tire is in place, it’s time to finish the process carefully and safely.
1. Lower the Car Safely
Slowly lower the vehicle using the jack until the spare tire rests firmly on the ground. Make sure the car is fully supported by all tires before completely removing the jack. Never place any part of your body under the car while it’s partially lifted.
2. Tighten the Lug Nuts
With the car back on the ground, use your lug wrench to tighten the lug nuts in a crisscross pattern. This ensures the tire sits evenly on the hub and prevents wobbling while driving. Start by tightening one nut, then move diagonally across to the opposite nut, repeating until all nuts are secure. Avoid over-tightening, which can damage the wheel bolts.
3. Inspect the Spare Tire
Double-check the tire pressure and ensure the lug nuts are firmly secured. Remove any tools, wheel wedges, and the flat tire from the work area. If your spare is a temporary “donut” tire, remember it’s meant for short distances at reduced speeds usually under 50 mph.
4. Clean Up and Drive Safely
Store the flat tire and tools in your trunk and remove any warning signs or reflective markers from the roadside. Drive cautiously, especially if using a temporary spare, until you can repair or replace the original tire.
Pro Tip: Practicing a tire change in a safe location like your driveway can make you more confident during real roadside emergencies. By following these steps carefully, you can handle flat tires like a pro and get back on the road quickly and safely.
Common Mistakes to Avoid
Changing a tire may seem straightforward, but many drivers make simple mistakes that can lead to accidents, damage, or wasted time. Being aware of these common pitfalls can make the process safer and more efficient.
1. Not Choosing a Safe Location
Stopping on a slope or in traffic can be dangerous. Always move your car to a flat, stable area and use hazard lights to alert other drivers. Safety should always come first.
2. Incorrect Jack Placement
Placing the jack under the wrong spot can damage your vehicle or cause the car to slip off the jack. Always follow your vehicle’s manual and ensure the jack rests on solid ground.
3. Over-Tightening or Under-Tightening Lug Nuts
Too much force can strip bolts, while too little can make the tire loose. Always tighten lug nuts in a crisscross pattern and ensure they’re secure but not forced.
4. Ignoring Tire Pressure
A spare tire that’s underinflated can be unsafe to drive. Always check your spare’s air pressure before installation.
5. Rushing the Process
Flat tires are stressful, but rushing can lead to mistakes or injuries. Take your time and follow each step carefully.
6. Using a Damaged Spare
Sometimes spares are old or worn out. Inspect your spare for cracks, punctures, or low tread before using it.
Pro Tip: Practicing a tire change in a safe environment helps you avoid these mistakes during a real emergency. Being prepared not only keeps you safe but also ensures your car stays in good condition.
Types of Spare Tires
Not all spare tires are the same, and knowing the differences can help you choose and use them correctly. There are two main types: full-size spares and temporary (donut) spares.
1. Full-Size Spare Tire
A full-size spare is identical to the other tires on your vehicle. It can be used for long distances and at regular driving speeds. The major advantage is that you don’t have to worry about restrictions or replacing it quickly. However, full-size spares are heavier and take up more space in your trunk, which is why some drivers prefer temporary spares.
2. Temporary “Donut” Spare Tire
A donut spare is smaller and lighter than a regular tire, designed for short-term use. It’s perfect for emergencies and allows you to drive to a repair shop safely. However, there are limitations:
- Usually limited to 50 mph or less
- Not meant for long distances
- Requires careful driving to avoid tire damage
3. Choosing the Right Spare
Check your vehicle’s manual to see which spare is recommended. Many modern cars come with a compact spare to save space, while SUVs or trucks often include a full-size spare. Regardless of the type, ensure it’s inflated properly and in good condition before an emergency arises.
Pro Tip: Even if you have a full-size spare, periodically inspect it for wear or low pressure. Being prepared with a reliable spare ensures that a flat tire doesn’t turn into a stressful situation.
How to Handle Emergencies on the Road
Even with knowledge and preparation, there are times when changing a tire yourself isn’t possible. Knowing how to handle these emergencies can keep you safe and reduce stress.
1. Stay Calm and Assess the Situation
If your tire goes flat in traffic or bad weather, remain calm. Turn on your hazard lights and carefully move your car to the safest possible spot, such as a wide shoulder or parking lot. Avoid stopping in the middle of the road or on uneven terrain.
2. Call Roadside Assistance
If you have a roadside assistance plan or insurance coverage, contact them immediately. Professionals can arrive quickly with a jack, spare tire, or towing service, especially in unsafe conditions.
3. Make Yourself Visible
Use reflective vests, hazard triangles, or emergency flares to alert other drivers. Visibility is crucial, particularly at night or during poor weather conditions, to prevent accidents.
4. Avoid Risky DIY Attempts
If the terrain is unsafe or you’re unsure how to change the tire, it’s better to wait for help. Attempting to lift the car on a slope or busy highway can be dangerous.
5. Prepare for Future Emergencies
Keep a small emergency kit in your car, including a flashlight, gloves, tire pressure gauge, and even a portable air pump. These tools can make roadside situations easier to handle.
Pro Tip: Staying calm, visible, and prepared is the key to managing tire emergencies. Even if you can’t fix the tire yourself, these steps ensure your safety until professional help arrives.
Preventive Tips to Avoid Flat Tires
While knowing how to change a tire is essential, the best strategy is prevention. Regular maintenance and awareness can reduce the chances of getting stranded with a flat tire.
1. Check Tire Pressure Regularly
Incorrect tire pressure is a leading cause of flats. Use a reliable tire pressure gauge to check your tires at least once a month and before long trips. Ensure the tires match the recommended pressure listed in your vehicle’s manual.
2. Inspect for Wear and Damage
Look for cracks, bulges, or embedded objects in your tires. Uneven tread wear can also indicate alignment issues or suspension problems. Catching these early can prevent sudden blowouts.
3. Rotate Your Tires
Regular tire rotation ensures even wear across all tires, extending their lifespan and reducing the risk of flats. Most manufacturers recommend rotating tires every 5,000 to 7,000 miles.
4. Avoid Road Hazards
Whenever possible, steer clear of potholes, debris, or sharp objects on the road. Even a single nail or sharp stone can puncture a tire. Driving cautiously in construction zones is especially important.
5. Carry a Tire Repair Kit
A small puncture repair kit or portable air pump can be a lifesaver for minor issues, allowing you to temporarily fix a tire until professional help is available.
Pro Tip: Prevention is always better than cure. By maintaining your tires and practicing safe driving habits, you can significantly reduce the risk of flat tires, saving time, money, and stress. A little care goes a long way toward roadside safety.
FAQs About Changing Tires
Even with a step-by-step guide, many drivers have questions about changing a tire. Here are some of the most common questions answered clearly:
1. How long does it take to change a tire?
For someone familiar with the process, changing a tire usually takes 15–30 minutes. Beginners may take longer, but with practice, it becomes faster and easier.
2. Can I change a tire alone?
Yes, it’s possible to change a tire by yourself if you have the right tools and follow safety precautions. However, having a friend or family member nearby can make the process safer and more comfortable.
3. What if my spare tire is low on air?
Always check your spare tire regularly. If it’s underinflated, you can inflate it with a portable air pump before driving. Never use a spare with dangerously low pressure, as it can cause accidents or damage your car.
4. How often should I check my spare tire?
It’s recommended to inspect your spare at least once a month and before long trips. Check the pressure, tread, and general condition to ensure it’s ready in an emergency.
5. What should I do if I can’t change the tire myself?
If the situation feels unsafe or you lack confidence, call roadside assistance. Stay visible, keep the hazard lights on, and wait in a safe location until help arrives.
Pro Tip: Knowing the answers to these FAQs can save time, prevent mistakes, and reduce stress during a flat tire emergency. Being prepared is the key to handling any roadside situation confidently.
Conclusion
Changing a tire may seem intimidating at first, but with the right knowledge, tools, and safety precautions, it’s a skill every driver can master.
From preparing your tools and checking your spare tire to following the step-by-step process and performing final checks, each stage plays a crucial role in ensuring a smooth and safe tire change.
Remember, safety should always come first choose a flat, stable location, use wheel wedges, and make yourself visible to other drivers while working.
Preventive measures, such as regular tire inspections, proper inflation, and rotating tires, can also reduce the likelihood of unexpected flats, saving time, money, and stress. Understanding the types of spare tires, common mistakes to avoid, and how to handle roadside emergencies further ensures that you’re prepared for any situation.
By practicing these steps in a safe environment, such as your driveway or a quiet parking lot, you’ll gain confidence and be ready to handle real-world emergencies efficiently. Don’t wait for a flat tire to test your skills preparation and practice are key.
Take action today: check your spare tire, inspect your tools, and familiarize yourself with the tire-changing process. With this knowledge, a flat tire no longer has to be a stressful experience it becomes just another routine part of vehicle maintenance. Stay safe, stay prepared, and drive confidently knowing you’re ready for any tire emergency.

Elizabeth Gilbert is a celebrated American author known for exploring self-discovery, spirituality, and life’s deeper meanings. Her writings inspire readers to uncover the hidden messages in dreams, symbols, and personal journeys—perfectly aligning with the mission of DreamMaening.com.